How Dye Testing Helps Find Hidden Plumbing Leaks

If you’re dealing with mysterious water stains, damp patches, or musty smells, a dye test might be the key to uncovering the problem—without tearing into walls or floors. This simple, non-invasive method helps pinpoint hidden plumbing leaks quickly and accurately, saving you time, stress, and unnecessary repair costs.
In this article, we’ll walk you through how dye testing works, when it’s most useful, and how it stacks up against other leak detection methods. Whether you’re a homeowner prepping for a renovation or a property manager chasing a recurring drip, this guide will help you decide if dye testing is the right move.
Here’s what we’ll cover:
- What Is a Dye Test in Plumbing?
- How Dye Testing Works (Step-by-Step Guide)
- When Should You Use a Dye Test?
- Benefits and Limitations of Dye Testing
- Dye Testing vs Other Leak Detection Methods
- Conclusion: Is Dye Testing Right for Your Plumbing Issue?
First, let’s take a closer look at what a dye test actually is—and how it can help you identify leaks you can’t see.

What Is a Dye Test in Plumbing?
A Simple Definition
A plumbing dye test is a straightforward, non-invasive method plumbers use to trace the path of water and identify hidden leaks in your plumbing system. The process involves adding a brightly colored, water-soluble dye—usually green, red, or fluorescent yellow—into specific areas like drains, toilets, or gutters. If there’s a leak, the dye will travel along with the water and visibly appear where it shouldn’t, revealing the exact leak source.
Think of it like adding food coloring to a glass of water—only instead of checking for color, plumbers are watching where that dyed water unexpectedly shows up. It’s particularly useful when the leak isn’t visible on the surface but is causing signs like water stains, musty smells, or unexplained moisture.
For example, if a homeowner in Marrickville notices water pooling near the base of a wall but can’t find the cause, a dye test can confirm whether it’s coming from a leaking shower drain behind the wall—without breaking tiles or cutting plasterboard.
This method is especially helpful for diagnosing invisible leaks in bathrooms, roofing, or drainage systems, where the water’s path isn’t obvious to the naked eye.
Common Types of Dye Used
To ensure the test is safe and effective, plumbers use non-toxic, biodegradable dyes that are easy to spot and safe for your plumbing and the environment.
Some of the most commonly used options include:
- Fluorescein dye – A bright yellow-green dye that glows under UV light, making it perfect for tracing leaks in low-light or concealed areas. Learn more about fluorescent leak detection and how UV technology enhances dye test visibility.
- UV dye (also known as tracer dye) – This dye reacts under ultraviolet light and is often used with a UV torch for pinpoint accuracy in darker spaces like wall cavities or ceiling voids.
- Standard colored dyes – Red, green, or blue dyes that are visible under normal lighting conditions, ideal for roof or gutter leak detection.
Each type is chosen based on the location of the suspected leak and the visibility needed during the inspection process. And don’t worry—these dyes won’t stain your home or plumbing fixtures when used correctly by a trained technician.
Key takeaway: A dye test is a safe, simple way to visually track down hidden leaks—without digging, damaging walls, or guessing. It’s one of the most reliable first steps in modern leak detection.

How Dye Testing Works (Step-by-Step Guide)
Dye testing might sound simple—and in many ways, it is—but getting accurate results requires experience, the right tools, and a careful approach. Here’s how a professional plumber carries out a dye test from start to finish.
Step 1 – Initial Inspection
Before any dye is introduced, a qualified maintenance technician will perform a visual inspection of the area. They’ll look for signs of water damage like:
- Peeling paint or bubbling plaster
- Musty odours
- Damp spots or discoloration on walls, ceilings, or floors
- Unexpected pooling or seepage
This inspection helps narrow down potential sources of the leak and identify the best area to apply the dye. For example, in a multi-level home in the Inner West, water spots on the ceiling below a bathroom might lead the technician to start the test at the shower or bath waste outlet.
This step is critical for choosing the correct fixture, system, or section of pipe to test—whether it’s a drainage system, toilet, gutter, or downpipe.
Step 2 – Introducing the Dye
Next, the plumber introduces a tracer dye into the suspected source. This might involve:
- Flushing dye through a toilet to check for slow leaks into adjacent areas
- Pouring dye into a shower drain to identify seepage behind walls or under floors
- Placing dye into roof gutters or stormwater drains to test for leaks into the building envelope
The dye tracer method works by mimicking the path that water would normally take. If there’s a leak, the dye travels with the water and escapes through the compromised section—making the hidden path visible without invasive work.
It’s important to note that only a small amount of dye is needed. The goal isn’t to flood the system, but to trace the water’s path naturally, as it would behave during normal use.
Step 3 – Observation and Confirmation
Once the dye is in the system, the technician watches for any signs of surface staining or unexpected reappearance of color in places it shouldn’t be. This is the moment of visual confirmation.
Depending on the area being tested, this might involve:
- Monitoring ceilings, floors, or walls for traces of dye
- Checking gutters, downpipes, or external walls for colored runoff
- Using mirrors, inspection cameras, or UV lights to check hard-to-see areas
If dye appears outside of the expected area, it confirms the leak source and helps pinpoint its exact location. This targeted result allows for non-invasive testing, meaning minimal mess, no guesswork, and faster repairs.
Sidebar: Can Dye Testing Be Combined with Other Tools?
Yes—and often, it’s even more effective when paired with other diagnostic testing tools. In tricky cases where leaks are hidden deep within walls or structural cavities, plumbers might use:
- Thermal imaging – Detects temperature changes caused by water intrusion. Here’s a deeper look at how thermal imaging works in plumbing inspections.
- Moisture meters – Measure dampness in surfaces without cutting or drilling
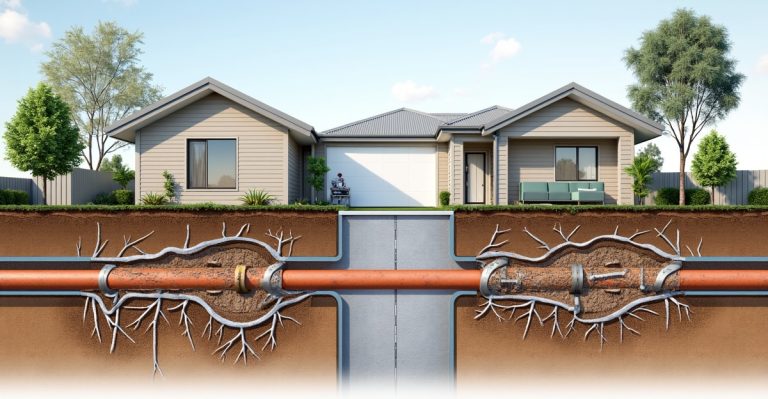
- CCTV camera inspection – Especially useful for confirming pipe leaks underground or in concealed drainage lines
By combining dye testing with these technologies, you get a clearer picture of what’s happening—and where—without unnecessary disruption.
Key takeaway: The dye test process is a step-by-step method that’s precise, low-impact, and fast. From initial inspection to visual confirmation, it’s all about tracing the leak’s path with accuracy and care—so you can fix the issue without tearing your home apart.

When Should You Use a Dye Test?
A dye test is one of the most useful tools for diagnosing leaks—especially when the source isn’t obvious or visible. It’s quick, clean, and doesn’t require damaging walls or fixtures to get answers. But when is it the right choice?
Here are the most common situations where dye testing makes sense.
Suspected Bathroom or Kitchen Leaks
Bathrooms and kitchens are the usual suspects when it comes to hidden leaks. If you’re noticing:
- Loose or lifting tiles
- Damp patches on adjoining walls or floors
- A persistent musty smell that doesn’t go away
…there’s a good chance you’ve got a leak hiding behind the scenes—possibly a shower leak caused by silicone failure.
Dye testing is perfect for this. By introducing dye into your shower drain, sink waste, or toilet, a plumber can trace the path of water and reveal where it’s escaping—whether it’s under the bath, behind wall tiles, or into the subfloor.
We often see this in older Sydney homes, like a federation-style cottage in Leichhardt where a client couldn’t figure out why the floorboards were warping outside the bathroom. A quick dye test showed that the shower drain had a hairline crack leaking water under the floorboards—something invisible to the eye but obvious once the dye came through.
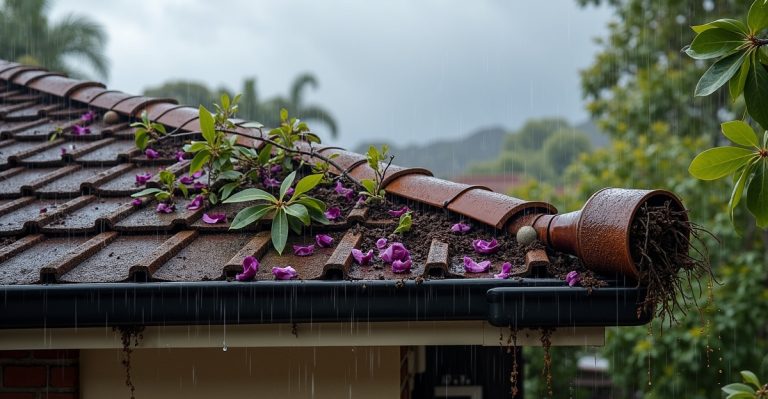
Roof, Gutter, or Stormwater Drainage Issues
When water starts appearing in places it shouldn’t—like in ceiling corners or along exterior walls—it’s easy to assume it’s just “a bit of bad weather.” But the real culprit could be a leak in your roofing system or gutters.
Dye testing can help determine:
- Whether stormwater is leaking into the ceiling cavity
- If a cracked downpipe is letting water escape into wall cavities
- If roof drainage is backflowing into internal spaces, a gutter leak detection dye test can confirm the exact location of the issue.
By pouring dye into specific areas of your roof gutter or drainage system, plumbers can track whether the water is escaping correctly—or leaking where it shouldn’t. This is especially helpful after heavy Sydney rainfalls when stormwater dye testing Sydney services can assess overloaded guttering systems.
Property Inspections or Pre-Sale Checks
If you’re buying, selling, or renovating a property, confirming the health of your plumbing system is a smart move. Dye testing plays a valuable role during:
- Building inspections – To test pipe integrity and confirm drainage flow
- Home inspections – Especially if the property has signs of past water damage
- Renovation prep – Ensuring no hidden leaks before waterproofing or tiling
A residential plumbing dye test is a low-cost way to spot small issues before they become big (and expensive) ones. For Sydney homes with aging infrastructure—particularly in suburbs like Balmain, Marrickville, or Newtown—it’s not uncommon to find corroded or cracked pipework hidden behind otherwise sound-looking surfaces.
Key takeaway: Use a dye test when you’re dealing with mystery leaks, dampness, or prepping a property for renovation or sale. It’s especially helpful in Sydney’s older homes, where aged pipes and complex drainage systems can complicate bathroom renovation budget planning.

Benefits and Limitations of Dye Testing
Like any plumbing diagnostic method, dye testing has its strengths—and a few limitations. Understanding both will help you decide whether it’s the right tool for identifying your leak issue.
Key Advantages
Non-Invasive Testing
One of the biggest benefits of a dye test is that it doesn’t involve cutting into walls, floors, or ceilings. Instead of guessing where a leak might be, your plumber can trace the flow of water with precision—leaving your home intact and stress-free.
Fast and Visual Confirmation
Dye testing offers almost immediate results. Once the dye is introduced, any leak will make itself known through visible staining or color appearing in an unexpected area. This quick turnaround means you can move forward with targeted repairs instead of trial-and-error exploration..
Budget-Friendly
Compared to more complex testing methods or exploratory demolition, dye testing is affordable and efficient. It’s often one of the first steps plumbers recommend because it delivers valuable insights without a high cost—especially important for homeowners or property managers trying to get answers quickly.
Limitations to Consider
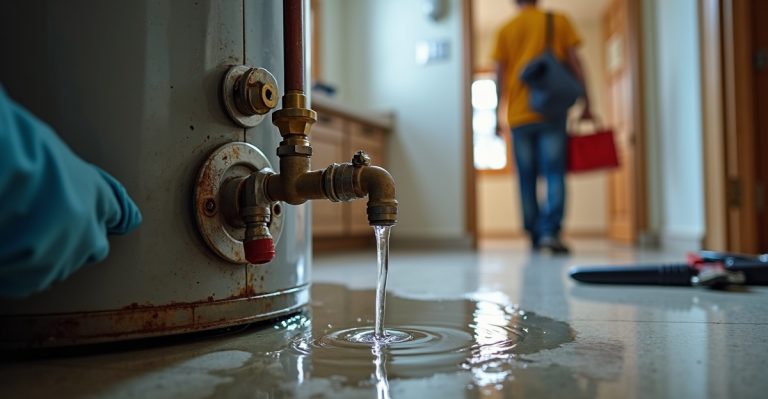
Requires Active Water Flow or Seepage
For the dye to work, water needs to be flowing—or at least seeping—through the system. If a leak is only intermittent or completely dried out, the test might not reveal anything until the system is in use again. In those cases, your plumber might need to simulate usage or run additional tests alongside the dye.
Not Ideal for Pressurised Hydraulic Systems
A sewer dye test is best suited to gravity-fed systems like drains, gutters, or waste pipes. It’s not typically used for pressurised plumbing (such as water supply lines) because those require different techniques like pressure testing or acoustic listening devices. Still, dye can sometimes assist in pinpointing the leak source once the general area is known.
Key takeaway: Dye testing is a fast, cost-effective, and low-impact way to locate leaks—especially in drains, bathrooms, or roofs. While it has a few limitations, it’s an excellent first step in identifying the problem without unnecessary mess or guesswork.

Dye Testing vs Other Leak Detection Methods
Dye testing is a reliable and cost-effective way to detect leaks—but it’s not the only method plumbers use. Depending on the type of leak, its location, and the plumbing system involved, other techniques might be used alongside or instead of a dye test.
Here’s a quick comparison of dye testing and other common leak detection methods:
| Method | Best For | Pros | Cons |
| Dye Testing | Drainage, roof, and non-pressurised systems | ✅ Non-invasive ✅ Fast visual results ✅ Budget-friendly | ⚠ Needs active water flow ⚠ Not suitable for high-pressure systems |
| Thermal Imaging | Warm water leaks, radiant heat, pipe condensation | ✅ Non-contact ✅ Detects heat variations ✅ Works through surfaces | ⚠ Less effective with cold water leaks ⚠ More expensive equipment |
| Acoustic Detection | Pressurised pipes and underground leaks | ✅ Pinpoints sound of escaping water ✅ Effective in large systems | ⚠ Can be affected by background noise ⚠ Requires skill to interpret |
| Manual Wall Removal | Last resort for confirmed leak areas | ✅ Provides direct access to pipes | ⚠ Highly disruptive ⚠ Costly repairs afterward |
When to Choose Dye Testing
Dye testing is ideal when:
- You suspect a shower, bath, or toilet leak
- You see damp spots but can’t tell where the water’s coming from
- You want to test roofing, gutters, or stormwater systems
- You’re preparing for a home inspection or pre-sale check
In many cases, it’s the first diagnostic tool used because it’s low-cost, fast, and effective. If more advanced testing is needed, a plumber may combine dye testing with tools like thermal imaging or moisture detection to confirm findings without tearing into your home.
Key takeaway: Dye testing is a smart first step for detecting common leaks in non-pressurised systems. It’s clean, quick, and pairs well with other methods when more precision or deeper investigation is needed.

Conclusion: Is Dye Testing Right for Your Plumbing Issue?
If you’re dealing with damp spots, unexplained water damage, or ongoing leaks that just don’t seem to go away, dye testing could be the smart first step to finding answers—without the mess or stress of tearing into walls or floors.
It’s ideal for:
- Pinpointing hidden leaks in bathrooms, kitchens, and roofs—especially with a roof leak dye test.
- Diagnosing roof, gutter, or stormwater drainage issues
- Verifying plumbing integrity during property inspections or renovations
- Getting a clear picture before investing in larger repairs
Dye testing is safe, non-invasive, and gives you visual confirmation of where water is escaping—so you can move forward with targeted repairs, not guesswork. And when used by a qualified technician, it’s a fast, budget-friendly way to rule out potential plumbing problems before they escalate.
Not sure if dye testing is the right fit? Give us a call—we’re happy to help. Our team can assess your situation and recommend the best next step, whether it’s a quick test or a more comprehensive plumbing inspection.
Frequently Asked Questions About Dye Testing
A plumber begins by identifying the area where a leak is suspected—such as a shower drain, toilet, or roof gutter. Then, they introduce a non-toxic, water-soluble dye (often a fluorescein dye or UV-reactive dye) into that system. The plumber monitors nearby surfaces for signs of the dye appearing where it shouldn’t—like walls, ceilings, or subflooring. This process provides visual confirmation of the leak’s exact location without needing to cut into your home.
Yes. Professional dye testing uses biodegradable, non-staining dyes that are completely safe for your plumbing system and the environment. When used correctly by a licensed technician, the dye won’t cause any damage, corrosion, or blockages—and it rinses away cleanly after the test.
Absolutely. Dye testing is often used to pinpoint roof leaks, faulty stormwater drainage, or overflowing gutters. By introducing dye into the roof or gutter system, plumbers can trace how water travels during heavy rain and identify any areas where it’s leaking into the building envelope—such as wall cavities or ceiling spaces.
Yes, that’s exactly what dye testing is designed for. If you’re seeing water damage but can’t tell where it’s coming from, dye testing helps trace the leak path—even behind walls, under tiles, or into crawl spaces. As long as there’s some active water flow or seepage, dye testing can help reveal the leak source that isn’t visible on the surface.
Most dye tests take between 30 minutes to 1 hour, depending on the area being tested and the complexity of your plumbing layout. You can expect:
A brief inspection process to identify the best test points
The introduction of dye into the plumbing or drainage system
Careful observation by the plumber to spot any signs of a leak
A clear service report or verbal summary of the findings
Recommendations for next steps, if a leak is found
There’s minimal disruption to your home, and no damage is done during the test. It’s one of the easiest and most effective ways to investigate plumbing problems without the guesswork.